Wednesday, May 28, 2014

The Cottage Cooking Club - May Recipes


Today we are starting a new online cooking group, the Cottage Cooking Club. As a group, recipe by recipe, we are cooking and learning our way through a wonderful vegetable cookbook written in 2011 by Hugh Fearnley-Whittingstall, called „River Cottage Everyday Veg“.

Hugh Fearnley-Whittingstall is a well-known British chef, TV personality, journalist, food writer and "real food" campaigner, known for his "back-to-basics philosophy". He is best known for hosting the River Cottage series, in which audiences observe his efforts to become a "self-reliant, downshifted farmer in rural England", his aim is to feed himself, his family and friends with locally produced and sourced fruits, vegetables, fish, eggs and meat.

The Cottage Cooking Club online cooking group is meant to be a project aimed at cooking more vegetable dishes, learning new ways to prepare tasty and healthy dishes and share them with family and friends.

We will make an effort to use as much local, regional, organic and also seasonal produce as is resonably possible. With that goal in mind, I prepared quite a few wonderful dishes from the book already.

My first recipe for the May post is the Courgette and Filo Rice Pie. For the filling of the pie you will need grated courgettes (I used yellow as well as green ones), long-grain rice, red onion, grated hard goat´s cheese, two eggs, fruity olive oil, some freshly chopped dill and flat-leaf parsley plus some freshly ground black pepper and sea salt. The pastry consists of ready-made filo pastry (I used ten sheets) and melted, unsalted butter.


This is a recipe with easy to find ingredients. We thought that this very delicious savory pie also looks pretty enough for company, especially when served in a nice baking dish.

Once the baked pie has had a chance to rest for a while, you can easily cut into it and serve nice slices to everyone around the table.


This pie is very pretty with the folded, crunchy filo sheets on top, it is easy to put together and we were very pleased with the way it tasted – together with a salad, this makes the perfect weeknight dinner for the whole family.


The second recipe from the book is Radishes with Butter and Salt, a colorful, time-honored springtime appetizer.


Eating radishes with salt and butter is not unusual around here and we always enjoy the peppery crunch of those lovely red radishes. Obviously, the fresher the radishes are that you are using, the better this simple dish will taste. I also suggest using a really good-quality butter and a nice salt such as Maldon sea salt or maybe skip the salt altogether and use a wonderful salted French butter.


And, of course, you could also vary the kinds of radishes that you are using.


The third recipe I prepared is the outstading Asparagus Pizza.


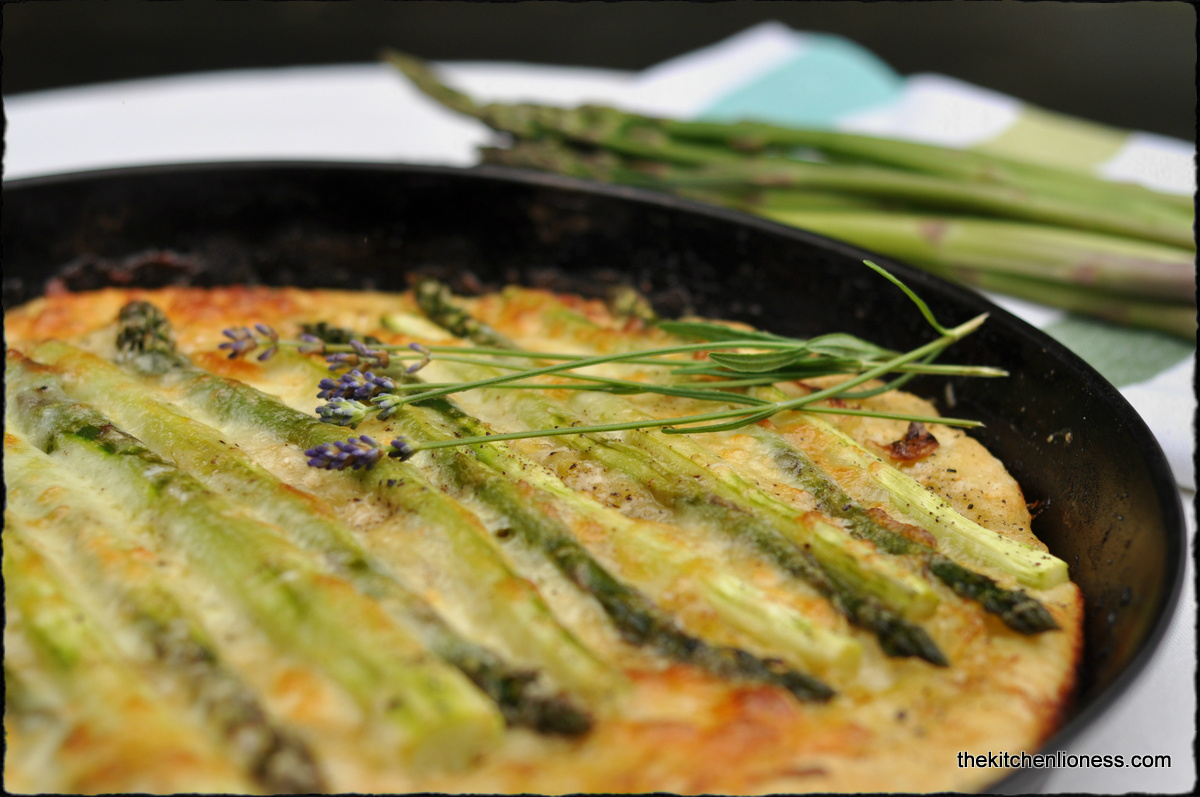
Once you have prepared the Magic Bread Dough from the book, you are ready to put this very seasonal pizza together in no time.


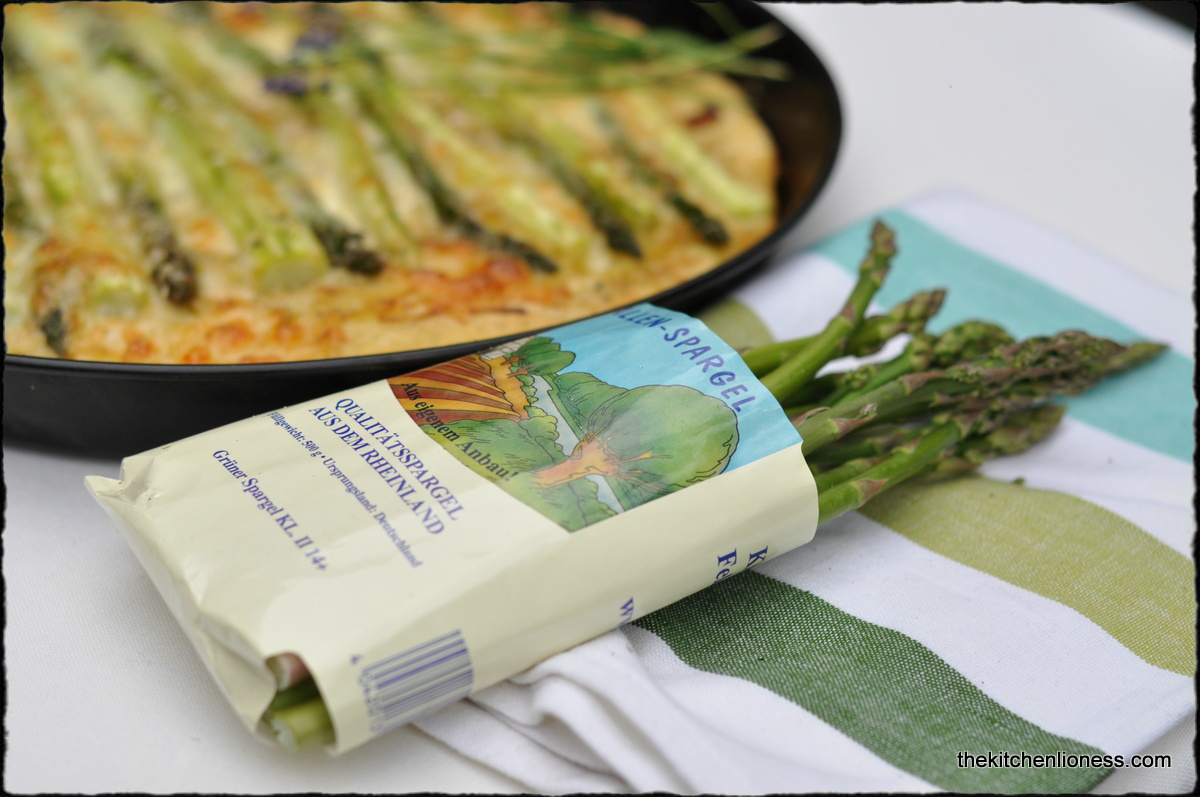
We really enjoyed the topping of buffalo mozzarella, a generous grating of Parmigiano Reggiano, sea salt, black pepper, some very fruity olive oil and the freshest regional  green asparagus that I could find. A definite hit with the kids. Rather than make a free-form asparagus pizza, I chose to use my trusted vintage pizza pan and added a bit more asparagus than the recipe called for.


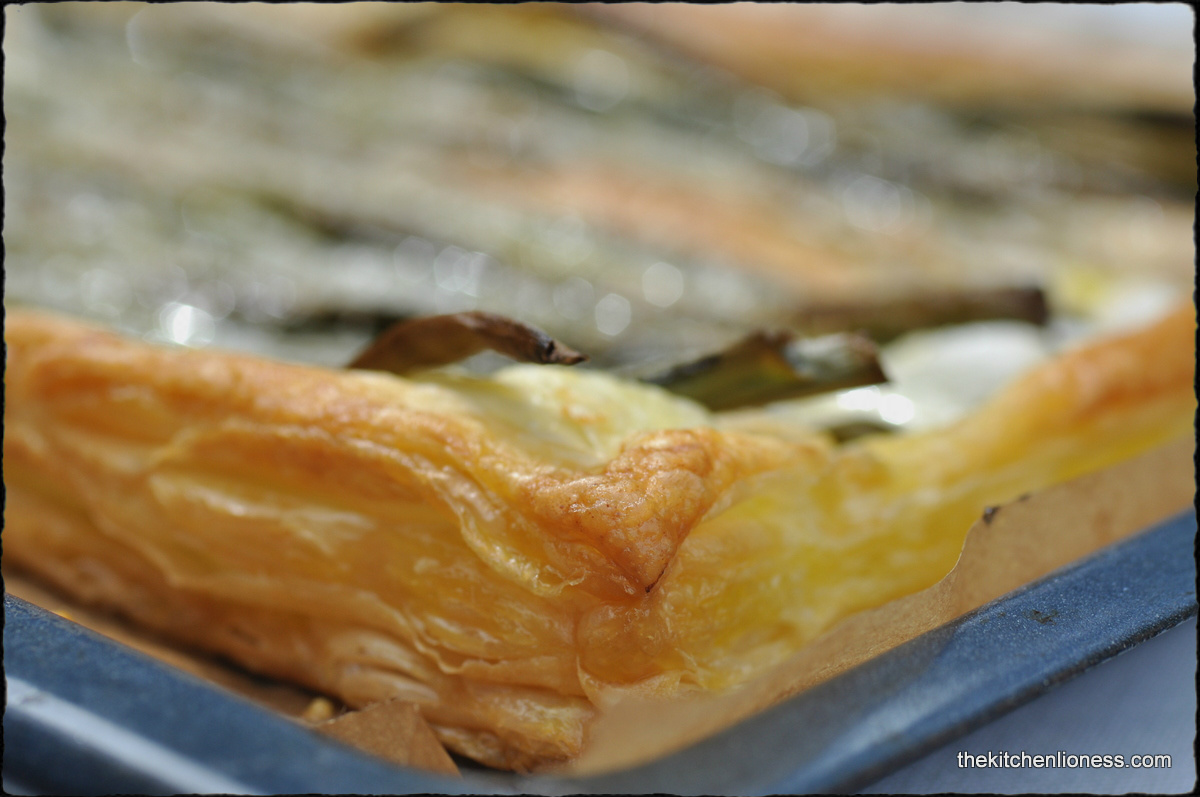
Now onto the fourth recipe that I prepared, this was my personal favorite one this month, the Spring Onion Galette, now there is a winning recipe.


Hugh Fearnley Whittingstall comments in his recipe that „the spring onions should be just charred in places and slightly chewy on the outside, yet steamed-tender in the middle“ – that is exactly how the spring onions turned out to be. Once they were baked for a good 20 minutes at about 200 degrees Celsius,  they just tasted like sweet perfection.


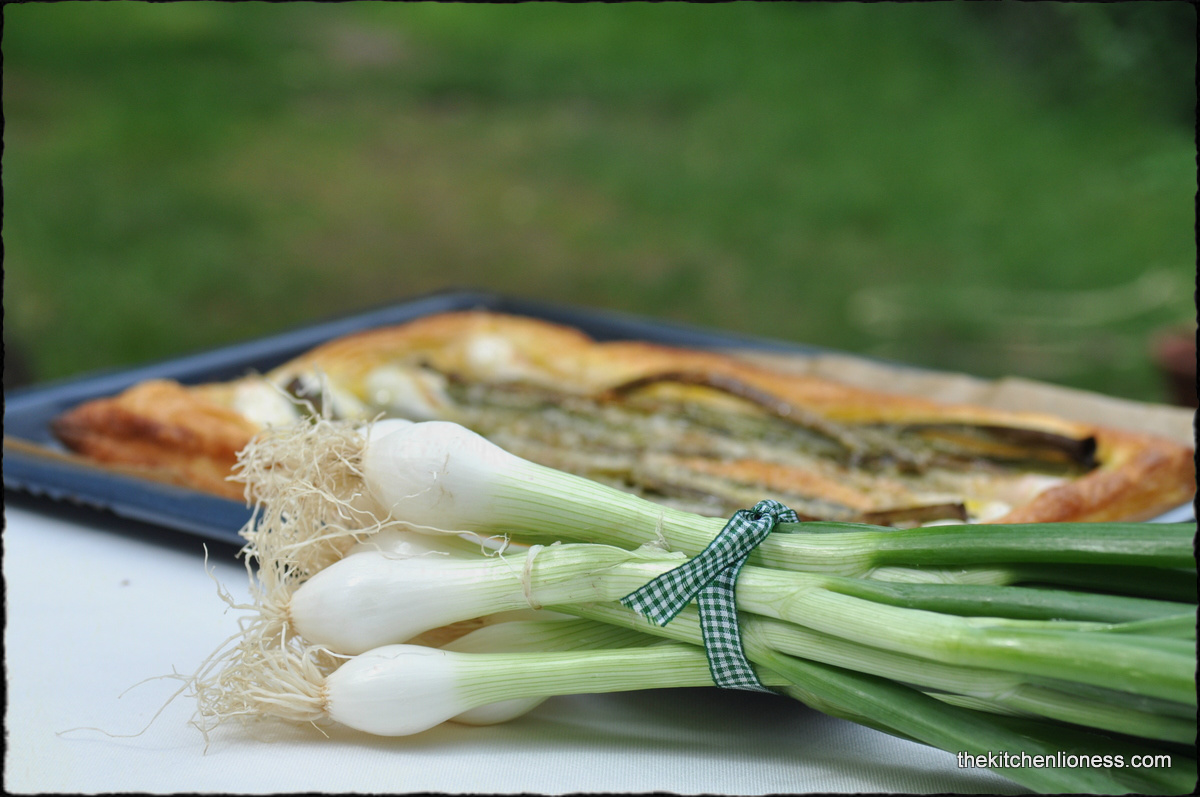
The base of the galette is a puff pastry.


And other than fresh spring onions, olive oil, pepper and salt, you will only need some tasty hard cheese. I chose a Pecorino Romano. A cinch to put together and such a delight to eat. The spring onions are rather bulbous at this time of year and while that look is rather pretty, it might be advisable to halve the onions before placing them on the galette – puff pastry is a nice treat and this galette is best enjoyed while still lukewarm. Love that recipe.


As a fifth recipe, I made the Quinoa with Courgettes and Onions. With the tender courgettes, the sweet onions, some lovely thyme from the garden and a bit of young garlic, this was such an unbelievably tasty salad. It does get even better when it had a few hours rest prior to serving.


The recipe calls for flat-leaf parsley, I used fresh basil instead and left out the pine nuts – my taste testers do not really like nuts in their salad – but other than these minor change, I stayed true to the recipe and really enjoyed it. Just remember if you are planning to make this salad  a few hours ahead of serving it, you will have to taste for seasoning again just before serving, I ended up re-seasoning with pepper and salt and a lot of lemon juice – I also served some fresh lemon wedges on the side with this salad – it really tastes fabulous with a last-minute squeeze of lemon juice.


The sixth recipe is Lemony Guacomole. The ingredients for this recipe are small chilies, chopped coriander, freshly squeezed lemon and/or lime juice, ripe and creamy avocados,  rapeseed oil, fine sea salt, freshly ground black pepper and some optinal yoghurt (I used 10% Greek yoghurt). Easy to find fresh ingredients, the remainder are pantry items. Perfect for a weekday evening. Got lucky and found two perfectly ripe avocados sans blemishes for this recipe.


I decided to make some homemade pita chips with fresh chives for dipping and served freshly cut limes on the side.This was a very well-received nibble/appetizer and while the kids support some spiciness in their food, I made sure not to overdo it - we all agreed that this is a fabulous recipe. This guacamole is equally delicious as a topping for burgers and as a dip for oven-roasted potatoes and freshly cut vegetables such as carrots and celery sticks. It can also be served as an accompaniment to fajitas, along with sour cream.

You can make it chunky or smooth, according to taste. Whichever way you serve it, if you do make it in advance, do remember to sprinkle the guacamole with lemon or lime juice and cover well with plastic wrap because avocados turn brown quite quickly once they are exposed to air.


The seventh recipe is Roasted Aubergine Boats. I decided to serve these warm with some lovely cold, thick Greek yogurt and a homemade wild garlic pesto. It certainly never hurts to have another aubergine recipe on hand and we enjoyed the contrasting flavors of the sweet, creamy, chili-oil spiked roasted aubergine, the cool yogurt and the fresh, peppery taste of the wild garlic pesto.


Last but not least, I prepared the Asian inspired Stir-fried Sesame Cauliflower. Cauliflower is available year round, and we have been able to find some really nice cauliflower this month, making this lovely vegetable a good choice for the eighth recipe from this book.


Hugh Fearnley-Whittingstall comments his recipe with the following words “cauliflower takes strong seasonings exceptionally well and this easy stir-fry – flavoured with chili, garlic and ginger – is a good example”. After taking one bite of this dish, I could not agree with him more.


This vegetable stir-fry is quickly put together and you can enjoy this as a full meal or as a side-dish. The cauliflower florets get a ten minute soak in cold water. The sesame seeds get toasted for a good minute or two until fragrant. In the meantime, you need to stir-fry some onion, two garlic cloves, chili and freshly grated ginger. Then add the drained cauliflower florets and continue to stir-fry. Finally, add the sesame seeds, good quality toasted sesame oil, low sodium soy sauce and finish with fresh coriander - although I took the liberty of adding coarsely chopped Italian parsley instead, as my dear family is not all that crazy about fresh coriander.

All of us really enjoyed this stir-fried sesame cauliflower – the fresh ginger and the chilies are wonderful in combination with the mild, delicate flavor of the cauliflower. It is true that this vegetable can certainly take some strong seasonings such as the soy sauce and the toasted sesame oil without being overpowered. This recipe seems to be nice variation on the other cauliflower recipes that I usually prepare. I also appreciated the fact that the stir-fried cauliflower florets kept their shape and still looked nice when plated.


Overall, we are extremly pleased with the way these recipes tasted and I am quite happy to report that this cookbook has become one of my favorites these days as the kids really enjoy the different dishes that I prepared from the book so far - it is truly a wonderful vegatable cookbook.

And I cannot stress enough that the recipes are easy to follow, with ingredients that are not difficult to find, making it a cinch to cook seasonally.

Please note, that for copyright reasons, we will not publish the recipes - maybe I can encourage you to buy this book and cook along with our wonderful group - we certainly would not mind some friendly company. For more information on the participation rules, please go here.

The designated recipes for the month of May were the following:

Courgette and rice filo pie (page 51), Rocket, fennel and puy lentil salad (page 82), Radishes with butter and salt OR Fennel and goat´s cheese (page 102), Pea and parsley soup (page 141), Asparagus pizza (page 185), Spring onion galette (page 220), Quinoa with courgettes and onions (page 279), Lemony guacamole OR Carrot hummus (page 296), Roasted aubergine boats (page 344), Stir-fried cauliflower (page 376).

To see which wonderful dishes the other members of the Cottage Cooking Club prepared in the month of May, please go here.

Saturday, May 24, 2014

FFwD - Smoked Salmon Waffles


Today´s recipe for the French Fridays with Dorie group is "Smoked Salmon Waffles" or "Gaufres au saumon fumé".


These are delicious savory homemade waffles laced with pieces of smoked salmon and scallions and served with all the trimmings (crème fraîche, smoked salmon, trout roe, and fresh dill) - they are quite an indulgent treat for a special day.


Although I am the proud ownwer of many a waffle iron (heart-shaped, Belgian waffle maker, crespelle maker, etc.), I cannot remember ever having made savory waffles before. We do not have the habit of eating waffles for breakfast around here. We ususally enjoy them with tea or coffee in the afternnon. Sometimes I prepare buttermilk waffles and serve some Canadian maple syrup alongside, or Belgian waffles with a yeast-based dough, or crispy crespelle-like waffles like my grand-mother used to bake but most often, I will make heart-shaped waffles with a light dusting powdered sugar, my kids favorite.


I decided to use my beloved heart-shaped waffle iron for this recipe and simply added a heaping tablespoon full of batter in the middle of the waffle maker - so I would end up with mini waffles, perfect for stacking them up and serving them as appetizers. It took a bit of time to use up all the batter, it did make a lot of small waffles, but once all the waffles were baked, I was quite enamored with the way these waffle stacks looked like - very pretty.


The batter is simple and very quick to put together, no rest period required either - all you need is plain flour, baking powder, sea salt, freshly ground black pepper, whole milk, eggs, unsalted butter, smoked salmon, a few scallions, and chives. After I took a look at the recipe, I decided to omit the scallions altogether and load up on chives instead and to add the smoked salmon on top of the finished waffles, instead of adding it to the batter. I just did not want to have my precious waffle maker to have a lingering smell of smoked salmon and onions after making these. And, in the end, I believe the waffles taste better and look prettier this way.


These savory salmon waffles have a nice golden color and wonderful flavor from the chives. They turned out a bit crispy on the outside and soft in the inside. Perfect.


When they are all dressed up with that lovely and decadent dollop of crème fraîche, a bit of vibrant and salty trout roe and some wonderfully fragrant fresh dill - they are impossible to resist. With these toppings, they do remind me of my mini Potato Rösti that I usually dress the same way, or some buckwheat blinis.


To see how much the other members of the French Fridays with Dorie group enjoyed this recipe, please go here.

If you happen to own Dorie Greenspan´s "Around my French Table", you will find the recipe for these lovely Smoked Salmon Waffles on pages 170-171.


Tuesday, May 20, 2014

Roasted Red and White Radishes - Geröstete Radieschen und Eiszapfen


The radish is a plant whose edible root is used in cooking. The texture of the root is crisp and crunchy like a carrot and its flavor is hot and peppery. Among the most popular varieties are the small, cherry-sized common variety which has a red skin and white flesh. Radishes can be cooked or eaten raw. They can either be eaten with skins on, thinly sliced on a mandoline and be added to salads, marinated in vinaigrette, or eaten as a snack with a light sprinkling of sea salt.
Das Radieschen ist eine Pflanze, deren essbare Wurzel in der Küche verwendet wird. Radieschen sind frisch und knackig wie eine Karotte, aber ihr Geschmack ist eher scharf und pfeffrig. Die ungefähr 3 cm dicken Knollen haben eine rote Schale und das Fleisch ist weiß. Radieschen können sowohl gekocht als auch roh verzehrt werden. Man kann sie zum Beispiel roh mit Schale essen, oder fein hobeln und in Salate mischen, marinieren oder als Snack mit eine Prise Meersalz genießen.


Small white radishes (they are literally called "icicles" in German) can grow anywhere between 10 to 15 cm long. They might look like very young daikons but they taste very similar to the small red radishes. They are much milder and not as peppery as many kinds of radishes and they have a high moisture content.They can be peeled and enjoyed whole or can be cut into thin slices and be used in fresh springtime or summer salads. Around here they are available from mid-May until July.
Eiszapfen oder sind eine weiße und längliche Sorte Radieschen, die zwischen 10 und 15 cm lang werden. Sie sehen zwar aus, wie ganz junger Rettich, schmecken aber wie Radieschen. Sie sind nur bedeutend milder und nicht so scharf, wie manche Radieschensorten. Eiszapfen sind sehr saftig. Man kann sie nach dem Schälen im Stück lassen und als Rohkost knabbern, oder in dünne Scheiben oder Stifte schneiden und in frischen Salaten verwenden. Man erhält sie regional meist Mitte Mai bis Juli im Handel.


For this recipe, I decided not to peel the white radishes but give them a really good scrub with my handy-dandy natural vegetable brush called "Gemüsebürste".
Für dieses Rezept habe ich mich entschieden, die Eiszapfen nicht zu schälen. Stattdessen ist meine schöne Gemüsebürste ist zum Einsatz gekommen. 


Whether you are buying red or white varieties, you should always choose firm-skinned radishes, with no blemishes. If they feel soft, they are likely to be spongy inside.The atttached greens still should look fresh and perky, not wilted. The bigger the radish, the less crisp its texture, so avoid larger examples.

To increase the crispness of radish, soak them in iced water for a couple of hours.

Always prepare radishes just before using, as they lose their potency when cut.

You can keep radishes in a perforated bag in the fridge for a few days. Always trim the leaves off before storing, as they'll draw moisture from the radish itself. You can keep the radish greens in the fridge, wrapped in moist kitchen paper then stowed in a perforated bag, for a couple of days.
Man sollte immer Radieschen und Eiszapfen mit fester Schale und ohne braune Stellen kaufen.Wenn sie sich weich anfühlen, dann sind sie fast immer etwas schwammig und nicht mehr frisch. Die Blätter sollten auch immer frisch und nicht schon müde oder verwelkt aussehen. Je größer die Radieschen sind, umso weniger knackig sind sie, also lieber kleinere Exemplare kaufen.

Man kann die Radieschen auch in Eiswasser legen, so werden sie besonders knackig.

Man sollte die Radieschen immer erst schneiden kurz bevor man sie genießen oder verarbeiten möchte, da sie in geschnittenem Zustand an Geschmack verlieren.

Wenn man Radieschen aufbewahren möchte, so sollte man sie in einem Beutel mit Löchern geben und im Kühlschrank lagern. Dann sollte man erst die Blätter entfernen, das sie bei Lagerung die Feuchtigkeit aus den Radieschen ziehen. Dafür die Blätter in ein Küchentuch wickeln und ebenfalls in einen Beutel mit Löchern geben.


Roasted red and white radishes

Ingredients
  • one bunch red and white radishes each with greens
  • 2 tbsps olive oil
  • 2 tbsps balsamic vinegar
  • sea salt and freshly ground pepper
  • 2 cloves garlic, minced
Geröstete Radieschen und Eiszapfen

Zutaten
  • je ein Bund Radieschen und Eiszapfen, mit Blättern
  • 2 EL Olivenöl
  • 2 El Balsamessig
  • Meersalz und frisch gemahlener schwarzer Pfeffer
  • 2 Knoblauchzehen, fein gehackt


Preparation
  1. Preheat oven to 400 degrees Fahrenheit. 
  2. Separate greens from radishes; wash both well. 
  3. Slice the red and white radishes in half and toss with 1 tablespoon each oil and vinegar. 
  4. Season with salt and pepper. 
  5. Arrange in a single layer on a rimmed baking sheet, cut-side down. 
  6. Roast until tender and golden, 25 to 30 minutes.
  7. Meanwhile, heat remaining oil and vinegar and the garlic in a medium skillet over medium high heat. Cook radish greens, tossing, just until wilted, about 1 minute.
  8. Season with salt and pepper. 
  9. Mix the roasted radishes together with the wilted greens and serve immediately.

Zubereitung
  1. Den Ofen auf 200 Grad vorheizen.
  2. Das Grün von den Radieschen und Eiszapfen entfernen. Alles sehr gut waschen.
  3. Die Eiszapfen und Radieschen halbierenund mit jeweil 1 EL Olivenöl und Balsamessig mischen.
  4. Mit Salz und Pfeffer würzen.
  5. Mit der Schnittstelle nach unten, auf ein mit Backpapier ausgelegtes Backblech legen.
  6. Ungefähr 25 bis 30 Minuten im Ofen rösten, oder solange bis das Gemüse golden ist.
  7. Während das Gemüse im Ofen brät, das Grün zubereiten. Dafür das restliche Öl und den Essig mit dem Knoblauch in einer Pfanne erwärmen und für zirka eine Minute zusammen mit dem Grün sanft braten.
  8. Mit Pfeffer und Salz würzen.
  9. Die fertig gebratenen Radieschen und Eiszapfen mit dem Grün mischen und sofort servieren.


The roasted red and white radishes make for a lovely side dish to roast chicken. Or enjoy them with some fresh country-style loaf of bread such as a sourdough.

The radishes are a delight to eat once they are roasted, a sweet, yet savory delight with a hint of pepperyness from the greens - my perfect kind of side dish at this time of year.
Die gerösteten Radieschen und Eiszapfen schmecken ganz wunderbar als Beilage zu gegrilltem Hähnchen. Oder einfach so, vielleicht mit einer Scheibe Landbrot.

Radieschen und Eiszapfen im Ofen zu rösten sind einfach mal eine andere Art der Zubereitung - das Gemüse wird dadurch ein bisschen süß, dennoch behält es eine leichte, angenehme Schärfe und schmeckt vorzüglich zusammen mit den etwas pfeffrigen Blättern. 


Sunday, May 18, 2014

FFwD - Jamie Oliver´s Food Revolution Day 2014


Yesterday, on May 16th, we participated in "Jamie Oliver´s Food Revolution Day 2014" – which has been so aptly described as “ a global day of action aimed to inspire people to get cooking (or baking) and champion better food skills for people of all ages”.


For the French Friday with Dorie group that means the assignment was a so-called "cook´s choice", meaning that the participants were free to choose one of the recipes from Dorie Greenspan´s cookbook “Around my French Table” and, in line with this year’s theme for Food Revolution Day “let´s get kids get excited about food", I chose the Corn Pancakes form Dorie´s book, a recipe we cooked back in June 2012 and that I have prepared many, many times since.


The kids love these little French pancakes, especially when I prepare them together with a tangy, springtime fresh radish-cress dip. So that´s what we prepared. Among other things.


We had a dozen kids for lunch at our house and there was a lot of food that we prepared and shared.


And there was lots of desserts too.


To see how much fun the other members of the French Fridays with Dorie group had on Jamie Oliver´s Food Revolution Day 2014, please do click here.


"Children who learn how to cook are hungrier for healthier choices."
(Jamie Oliver Foundation)


Wednesday, May 14, 2014

Strawberries and Sheep´s Milk Feta - Erdbeeren mit Schafsmilchkäse


Last weekend we attended a regional Sheep Judging Competition that was held at one of our favorite places to visit with the kids, an outdoor museum. It is just about a thirty minute drive from where we live, so when the museum holds one of its special events, such as Pretzel Day, Market Day, etc. we make sure to visit whenever we can.
Am vergangenen Wochenende haben wir mit unseren Kindern den Bergischen Schäfertag im LVR-Freilichtmuseum in Lindlar, welcher dort in seiner 6. Auflage abgehalten wurde, besucht. Das Museum ist nur etwa dreißig Minuten Fahrtzeit entfernt, so dass wir zu besonderen Veranstaltungen gerne dorthin fahren.


On Sunday, there was also honey from the local beekeeper, who keeps his bees within the boundaries of the outdoor museum, as well as jams, jellies, syrups and other specialties to choose from. You could feast on grilled sausages or a special type of meatloaf ("Lberkäse") or craft a Mother´s Day gift using natural materials such as birch twigs, moos, and wood. But there was one product in particular that caught my attention, namely an organic Sheep´s Milk Feta in a salt water brine from a regional producer.
Es gab an diesem Tag auch Honig von einem Imker, dessen Bienenkörbe auf dem Gelände des Museums stehen. Auch Marmeladen, Gelees, Sirups und andere Spezialitäten wurden verkauft. Es wurden Würstchen und Leberkäse vom Grill angeboten oder man konnte ein Muttertags-Geschenk aus Naturmaterialien, wie Birkenzweigen, Moos und Holz basteln. Ein Produkt hat aber insbesondere meine Aufmerksamkeit erregt, nämlich Schafsmilchkäse in Meersalzlake vom Schäferhof.


We really enjoy goat cheeses but we also are true fans of sheep´s milk cheeses. With its earthy aromas, a quality sheep´s milk feta cheese combines all the elements we admire in cheese - creamy, sweet, salty, and savory.
Wir mögen Ziegenkäse wirklich gerne, aber Käse aus Schafsmilch schmeckt uns fast noch besser - und nach Art des Fetas in Meersalzlake eingelegt, schmeckt er wunderbar mild und cremig.


Sheep´s milk cheese is perfectly suited for a range of different recipes, and while the producer had a selection of recipes on display that all sounded wonderful, I was taken by the idea of combining sweet strawberries with the salty sheep´s milk feta. Especially since the first local strawberries have hit the markets around here and are quite delicious.
Schafsmilchkäse eignet sich hervorragend für eine Reihe von verschiedenen Rezepten. Am Stand des Schäferhofs lagen auch jede Menge leckere Rezepte aus, aber die Idee einer Kombination von süßen Erdbeeren und Schafsmilchkäse hat mich dann doch am meisten interessiert. Vor allem, weil hier seit einigen Tagen die ersten süßen Erdbeeren aus der Region erhältlich sind.


Strawberries and Sheep´s Milk Feta

Ingredients 
  • 250 grams feta cheese of your choice (brined in salted water, not oil) 
  • fresh strawberries 
  • fresh basil leaves, torn or whole (I used purple and green basil)
  • a few drizzles of crema di balsamico
  • freshly ground pepper (black or white)
Erdbeeren mit Schafsmilchkäse

Zutaten
  • 250 Gramm Feta oder anderer Käse nach Art des Fetas (in Salzlake)
  • frische Erdbeeren 
  • frisches Basilikum, ganze oder in Stücke gezupfte Blätter (ich habe violettes und grünes Basilikum genommen)
  • ein wenig Crema di Balsamico
  • frisch gemahlener Pfeffer (schwarz oder weiß)


Preparation
  1. Wash and dry the strawberries carefully. Then hull them and cut them in half or quarters.
  2. Take the feta out of the brine and drain on paper towels.
  3. Cut the feta into cubes.
  4. On a platter, gently combine the cubed feta and strawberries. Drizzle with crema di balsamico. Finish with some fresh basil leaves.
  5. Add freshly ground pepper to taste and serve immediately. - Served as a first course or as a side dish to roast chicken or lamb chops for example. Bread is also nice alongside.
Zubereitung
  1. Die Erdbeeren vorsichtig waschen und trocknen. Stiele entfernen, dann vierteln oder halbieren.
  2. Den Feta aus der Lake nehmen und auf Küchenkrepp abtropfen lassen.
  3. Feta in Stücke schneiden.
  4. Auf einem Teller oder einer Platte, vorsichtig Feta und Erdbeeren mischen. Mit etwas Crema di Balsamico beträufeln. 
  5. Etwas schwarzen Pfeffer darüber mahlen, mit den Basilikumblättern ausgarnieren und dann sofort servieren. - Entweder als Vorspeise oder als Beilage zu Hähnchen oder Lammkoteletts servieren. Etwas frisches Brot als Beilage schmeckt auch immer.


If you have run out of or if your store does not carry, crema di balsamico, here is a recipe how to make some at home. A fun recipe to have on hand anytime you are looking to add a special touch to a dish.


Crema di Balsamico

Ingredients
  • 100 ml aceto balsamico
  • 1 tbsp water
  • 20 grams sugar
Preparation
  1. In a small saucepan, combine the aceto balsamico, water, and the sugar. 
  2. Bring to a boil. Then gently simmer until the liquid has cooked down to half or your preferred consistency.
  3. Let cool completely and pour into a sterilized glass jar or bottle and keep in the fridge until ready to use.
Falls man gerade keine Crema di Balsamico zur Hand hat, oder falls man einfach mal selbst eine Crema herstellen möchte, kann man das folgende Rezept ausprobieren..

Crema di Balsamico

Zutaten
  • 100 ml Aceto Balsamico
  • 1 EL Wasser
  • 20 Gramm Zucker
Zubereitung
  1. In einen kleinen Topf den Aceto Balsamico, das Wasser und den Zucker geben.
  2. Zum Kochen bringen. Dann auf kleiner Flamme einkochen - zur Hälfte reduzieren oder bis die Crema die gewünschte Konsistenz erreicht hat.
  3. Abkühlen lassen. Dann in ein sterilisiertes Glas oder Flasche füllen und in den Kühlschrank aufbewahren.


Different types of feta can be called in to perk up couscous, salads, pizzas and pastas. Or you could try recipes for lamb chops with feta and lemon or a classic Greek salad. Feta is traditionally made from ewes’ milk or a mixture of ewes’ and goats’ milk but now sometimes made using cows’ milk. Feta is either preserved in brine or oil and has quite a salty flavor. You can buy feta pre-packed in most supermarkets and it is also widely available ready-cubed in jars of oil, often flavored with herbs and sun-dried tomatoes. Feta holds its shape quite well so it can be carefully skewered and grilled or barbecued. If you want to remove some of the saltiness of the feta cheese, just soak the cheese in milk or water for a couple of minutes prior to using in a recipe.
Man kann verschiedene Sorten Feta ausprobieren um Couscous, Salate, Pizzas and Pastagerichte geschmacklich abzurunden. Man kann auch wunderbare Lammkoteletts mit Zitrone und Feta zubereiten oder einen klassischen griechischen Salat. Feta wird entweder in Öl oder in Lake verkauft und hat meist eine recht salzige Note. Man kann Feta in den meisten Läden finden, entweder im Ganzen, oder stückig und schon in Öl und Kräutern oder mit sonnengetrockneten Tomaten eingelegt. Feta hat eine relativ feste Konsistenz und eignet sich deshalb auch sehr gut, um auf Spießen serviert oder gegrillt zu werden.Wenn man den salzigen Geschmack des Fetas etwas mildern möchte, kann man den Käse kurz vor der weiteren Verarbeitung für einige Minuten in etwas Milch oder Wasser einlegen.


It is always nice to be able to prepare food for the family using regional products and I can only recommend trying out new recipes using with what is available in your region. You might be surprised with the delicious results. This sheep´s milk feta, for example, has a wonderful mild and creamy taste, it is regional and organic – feel good all around…and the best part is that even the young taste testers were enamored with the combination of sweet strawberries, peppery basil, slightly salty and creamy feta and the sweet and tangy taste of the crema di balsamico.
Es ist immer schön, wenn man die Möglichkeit hat, regionale Produkte für die Zubereitung des Essens zu verwenden. Man entdeckt dabei wunderbare Produkte und probiert vielleicht Rezepte, die man normalerweise nicht so zubereitete hätte. Dieser Schafsmilchkäse zum Beispiel wird nach hauseigenem Rezept und unter Einhaltung der Biolandrichtlinien hergestellt. Nach Art des Fetas in Meersalzlake eingelegt, schmeckt er mild und cremig. Die Kombination aus süßen Erdbeeren, pfeffrigen Basilikum, mild-salzigem Schafskäse und der süß-salzigen Crema di Balsamico hat sogar die jüngsten Geschmackstester begeistert.


Feel free though to use your preferred type of feta for this salad or add some other salad greens such as arugula – the dish will certainly be just as delicious with your individual adaptations according to personal preference and to what is available in your neck of the woods.

For more information on the producer of the sheep´s milk cheese, please click here. For more information about the outdoor museum, please click here.
Natürlich kann man auch andere Sorten Feta für diese Vorspeise/Salat verwenden. Anstatt des Basilikums kann man auch gerne anderes Salatgrün wie zum Beispiel Rauke dazu geben – je nachdem was man selbst am liebsten geniesst.

Für mehr Informationen über den Hersteller des Schafsmilchkäses, bitte hier klicken.Zur Seite des Freilichtmuseums geht es hier.